Poultry Lighting Management: Poultry Lighting Equipment Layout and Management

Directory:
1. Control of Light Intensity for Laying Hens
2. Arrangement and Management of Poultry Lighting Equipment in Laying Hen Houses
3. Guidelines for Light Management
Chicken farmers widely acknowledge the importance of light in fostering growth, development, gonadal maturation, ovulation, egg laying, boosting immunity, and disease prevention. However, many farmers overlook the scientific and rational management of poultry lighting systems, particularly for laying hens, which can negatively impact egg production and economic returns.
The author, with over 30 years of experience in poultry technical services, often observes that many chicken farms, especially smaller ones, focus primarily on managing temperature, ventilation, sanitation, disease prevention, and feed nutrition for laying hens. They tend to only consider the duration of poultry lighting (natural plus artificial) without paying attention to the appropriate light intensity. Issues such as improper arrangement of electric lights, incorrect light bulb sizes, and inadequate illumination can lead to uneven lighting or inappropriate brightness levels, ultimately diminishing the egg-laying performance of hens and harming farmers' profits.
The following discusses some insights on managing poultry lighting equipment (light bulbs) in laying hen facilities:
1. Control of Light Intensity for Laying Hens
1.1 Light Intensity Standards for Laying Hens
Light intensity refers to the brightness of light. Most chicken farms currently use a light intensity standard of 10 to 40 lux (1 to 4 foot candles) for laying hens. In multi-tiered housing, the light intensity is not uniform across layers, with the bottom layer typically receiving the least illumination. For instance, the top layer of a three-tier cage usually has 3 to 3.5 times the illumination of the bottom layer.
1.2 Units of Light Intensity
The common units for measuring light intensity (illuminance) in modern poultry production are lux and foot candles. One lux is defined as one lumen of light evenly distributed over an area of one square meter, while one foot candle is one lumen over an area of one square foot (1 foot candle = 10.76 lux). The power of incandescent bulbs is measured in watts (W), with one watt producing approximately 12.56 lumens of light. However, due to only 49% efficiency, the effective light output of one watt is about 6.15 lumens (12.56 × 49%), meaning a 1W incandescent bulb emits around 6.15 lux of effective light.
1.3 Determining Light Intensity and Number of Bulbs
For instance, a chicken farm has a 500m² laying hen house currently utilizing three-tiered cages and plans to install 25W incandescent bulbs. To achieve the standard illumination of 10 lux (Lx) on the bottom floor, we need to calculate the number of bulbs required.
According to the standard, the total light needed for a 500m² area is 5000 lumens (Lx), calculated as 500m² multiplied by 10Lx. Each watt of bulb power provides an effective illumination of 6.15Lx, so to meet the 5000Lx requirement, we need bulbs with a total effective power of 813W (5000 divided by 6.15).
If each bulb is 25W, we will need to install 32 bulbs (813 divided by 25).
2. Arrangement and Management of Poultry Lighting Equipment in Laying Hen Houses
To optimize the performance of poultry lighting equipment in the chicken house, a scientific design approach should be adopted, focusing on efficiency and cost-effectiveness. The general guidelines for arranging poultry lighting equipment include maintaining a short distance between lamps, using numerous bulbs with lower wattage, ensuring uniform light distribution, and providing adequate illumination.
2.1 Bulb Height
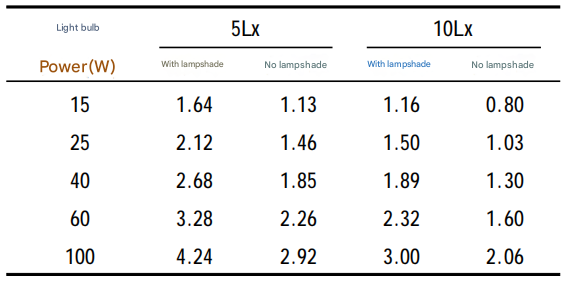
The height of the bulb refers to its distance from the ground. To ensure the safety of staff working beneath the lights, bulbs should be positioned 2.1 to 2.4 meters above the ground. The wattage of the bulbs should be chosen based on the required light intensity (refer to Table 1). Table 1 indicates that artificial lighting with reflectors is more effective than without; additionally, bulbs with shades can be positioned higher above the chickens compared to those without. A bulb with a cover can enhance light intensity at the chicken's level by 30% compared to an uncovered bulb of the same wattage.
table1 The height of the chicken from the light bulb(m)

2.2 Bulb Spacing
The recommended spacing between bulbs is typically 1:1.5. meaning the distance from one bulb to another should be 1.5 times the height from the bulb to the chicken's back. Additionally, the distance from the bulbs to the edge of the chicken house should not exceed half the distance between the bulbs. For instance, if a bulb is positioned 2.12m above the chicken's back, the spacing between bulbs would be 2.12 × 1.5 = 3.18m, and the distance from the bulbs to the edge of the chicken house should be 1.59m. Generally, each chicken house is equipped with a single bulb.
2.3 Bulb Row Spacing
To ensure even lighting for the chickens, the spacing between rows of bulbs should match the width of the ladder cage. The bulbs should be installed above the walkways rather than directly over the chicken cages, with the number of bulb rows corresponding to the number of walkways. The bulbs in adjacent rows should be arranged in a staggered, zigzag pattern.
2.4 Lamp Selection
Choosing the right lamps is crucial for maintaining high-quality lighting.
3. Guidelines for Light Management
To achieve consistent lighting, consider the following when installing and managing poultry lighting fixtures:
3.1 Opt for lower wattage bulbs to increase the total number of bulbs used. Typically, bulbs rated between 25 to 40W are ideal, and it is advisable to avoid bulbs exceeding 60W. Higher wattage bulbs result in fewer fixtures, increased lamp height, and greater spacing between lamps, leading to uneven illumination where the area directly under the lamp is much brighter than farther away.
3.2 If installing two rows of bulbs, ensure that the bulbs in each row are staggered.
3.3 For multi-tiered cages, position the bulbs to adequately light the feed trough while also considering the height of the chickens, ensuring the lowest layer receives sufficient light.
3.4 In a flat chicken house without aisles, the lamp height should allow staff to walk comfortably, ideally between 2.1 and 2.4 meters.
3.5 In open chicken houses, secure the bulbs to prevent them from swinging in the wind, which could startle the chickens and disrupt production.
3.6 The design of the lampshade can significantly influence the illuminated area, particularly its angle; a smaller angle results in a reduced light area, and vice versa. Therefore, when selecting a lampshade, consider the area it will illuminate to maintain uniformity.
3.7 Regularly clean the lampshade to ensure optimal light output, as a dirty bulb can emit only one-third of the light of a clean one. It is recommended to clean them every two weeks, especially in caged environments, to maintain cleanliness.
3.8 Promptly replace any damaged or aging bulbs to avoid impacting illumination levels, with particular attention in cage houses.
3.9 Ensure a reliable power supply with stable voltage and have backup equipment or measures in place for power outages.
3.10 To maintain proper lighting levels, regularly use an illuminance meter for measurement and calibration.